

Exploiting Metasploitable 2 with Nessus and Metasploit
Lab Setup
For this lab, I’m working with two VMs alongside my Kali machine:
- Metasploitable 2
- Windows 8
The first step is to ensure all VMs are on the same network and can communicate. I verify this by pinging each VM from my Kali machine.
Pinging Metasploitable 2 and Windows 8

The second ping (to Windows 8) is unsuccessful because, by default, Windows 8 does not respond to ICMP echo requests. A firewall rule blocks incoming ICMP packets, causing the result above. Since I have access to the Windows 8 machine, I pinged Kali from it instead – this time, there was no packet loss.

Note:
To enable Windows 8 to accept ICMP echo requests through the firewall, you can check out my post on How to Enable ICMP Echo Requests (Ping) in Windows 8. After making the change, I was able to successfully ping the Windows 8 VM.
Aggressive Scanning Using Nessus
First, I start the Nessus Daemon.
(A daemon in Linux is a background process that runs without user interaction. Different daemons manage different subsystems to keep the OS running smoothly.)
To check if Nessus is running:
service nessusd status
Running this command shows that it is inactive. If it’s inactive, start it with:
service nessusd startNow that Nessus is running, in a browser on my Kali machine, I navigate to the loopback IP address (also known as localhost) at 127.0.0.1, with the port number of the Nessus service (port 8834) and log in to Nessus Essentials.

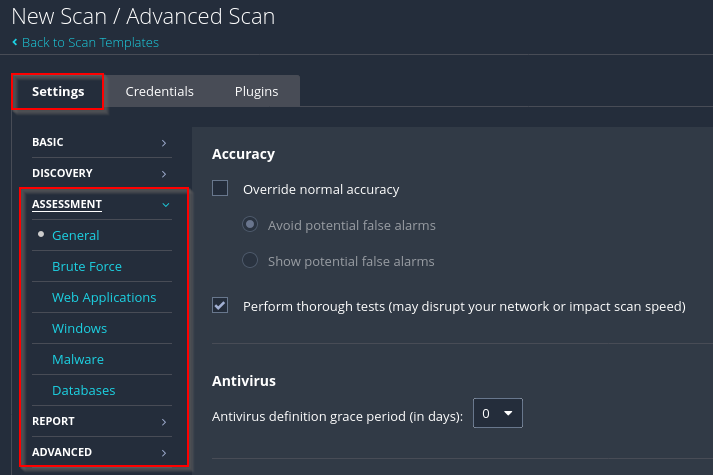
I create a new Advanced Scan for a more aggressive scan compared to the Basic Network Scan. The key settings I adjust in the left pane are:
- Assessment tab: Enable “Perform thorough tests” (may disrupt your network or impact scan speed)
- Report tab: Enable “Override normal verbosity“.
- Advanced tab: Uncheck “Enable safe checks” (since this is my own isolated lab network, I want to gather as much information as possible).
In the Credentials tab, I select SSH since I know the username and password for Metasploitable 2 (msfadmin).
- Change the authentication method from public key to password.
- Enter the credentials.

In the Plugins tab, I disable plugin families not applicable to my lab environment:
- CISCO
- F5 Networks Local Security Checks
- Huawei Local Security Checks
- MacOS X Local Security Checks

Time to launch the scan!

The scan took about 26 minutes to complete.

The scan found 33 critical vulnerabilities on the Metasploitable machine. Keep in mind: false negatives are possible – meaning there may be other vulnerabilities that Nessus Essentials didn’t detect.
Critical vulnerabilities are the most severe. The more there are, the greater the potential for an attacker to exploit the system.
Selecting one of the critical vulnerabilities displays useful information:

Bind Shell Exploitation Misconfiguration
I select the vulnerability labelled “Bind Shell Backdoor Detection”.

This vulnerability indicates that an open backdoor already exists on the machine. To test this and confirm whether it’s a true positive, I use Netcat to connect to the reported port:
nc <ip address> <port>If successful, this gives me root privileges on the Metasploitable 2 machine.

As a root user, I now have access to all files and folders in the remote machine. I can gather the hashes of the users’ passwords with the following command:
cat /etc/shadow
Java RMI Vulnerability
Back in the Nessus scan results, I notice an informational vulnerability titled RMI Registry Detection. Next, I’ll use the Metasploit Framework to check for an exploit for Java RMI.

Scanning For Open Ports Using Nmap
Using Nmap in Kali, I scan Metasploitable 2 for open ports:
nmap -sS 192.168.179.139 -sV -p1-65535Using Metasploit Framework To Exploit The Vulnerability
In msfconsole, I search for a suitable exploit:

I select the appropriate exploit and view the available payloads. The default payload is java/meterpreter/reverse_tcp.
Since I want a Meterpreter session, I’ll leave it as is. To view the available options:
show options
I set:
- RHOST to the target’s IP
- LHOST to my Kali machine’s IP
I leave SRVPORT and LPORT as default values.
Then, run the exploit:

A session was successfully started. To check active sessions:
sessions -lTo interact with a session, use the session ID:

Inside the Meterpreter session, using commands like sysinfo, I can confirm the operating system and view password hashes:


